Mazaika-Animation Tutorial
These topics will help you to work with Mazaika-Animation and give you the best-animated photo mosaics.
This tutorial uses screenshots of Mazaika-Animation for macOS but it relevant to MS Windows version as well.
How Barbarella Animation mosaic was made
Difference between Simple and Controlled Fly-ins
Zoom sequence with an optimal path
How Barbarella Animation mosaic was made
This picture mosaic itself was made a long time ago. It becomes popular over the Internet and even was used as a decoration for major movie Funny People (2009) directed by Judd Apatow with Adam Sandler, Seth Rogen and Leslie Mann in the lead roles. It is a portrait of Jane Fonda as Barbarella assembled from comic books covers. You may see large detailed interactive mosaic at this link.
For this nice demonstration of Mazaika-Animation, we wanted to make video animation featured Wonder Woman comic used in the mosaic. That’s the final result:
And below is a description of how we did it:
1 - You need a rendered Mazaika Project file and you need original tile pictures in the same locations as they were when you made Mazaika project. (Mazaika-Animation needs to open these original tile images to generate high-resolution video)
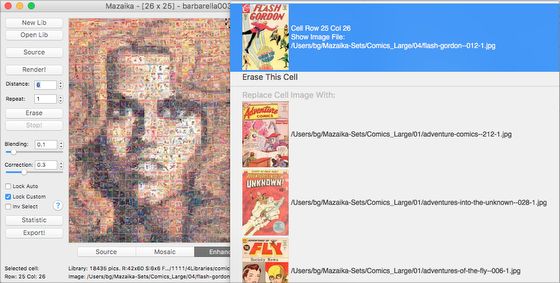
2 - Start Mazaika-Animation and Open Mazaika Project file

3 - Adjust the duration of separate Fly-in segments.
3.1 - Set simple animation duration for 18 seconds

3.2 - To make 24 seconds of controlled animation duration we have to adjust Launch Speed to 34. It was done with trial and error method because the duration also depends on Min and Max flight durations and you may play with all three parameters for some interesting effects.

4 - Set up featured cells for Zooms section
4.1 - Select Zooms tab and press Make Steps button.

4.2 - At the bottom of Zoom sequence properties panel you may see a table with cells coordinates. These are Row and Column coordinates of featured cells. When the program opens a project it fills the table with ten randomly selected cell coordinates. To make the program to display our custom set of cells we need to erase all lines in the table and type our coordinates.
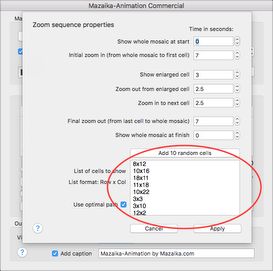
As you remember we wanted to display Wonder Woman comic covers. To do so let's go back to Mazaika program and press Statistic button.

Export cell statistic to a text file. (Use Save as... button)

Find lines with Wonder Woman at the exported text and select column with their coordinates. (Do you remember that macOS allows you to select vertical text columns when you drag your mouse with alt key pressed?)

Paste these numbers into the table and press Apply to finish. (We left all other parameters as they were by default but you may modify them as well.)

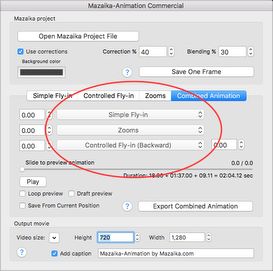
5 - Go to Combined tab and assemble the whole animation. We wanted to start it with Simple Fly-In, the next segment is Zooms and finally Controlled Fly-In running backward.
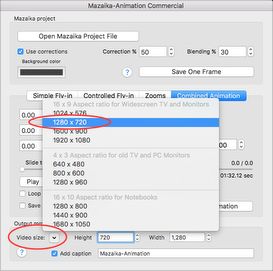
6 - Select output movie resolution. You may select the resolution from a pop-up menu or simply enter resolution numbers manually. We set the resolution to 1280x720
7 - Press Export Combined Animation button and enter a name for the exported movie. (If you have Commercial Licence you have an option to save the movie as a series of separate frames.)
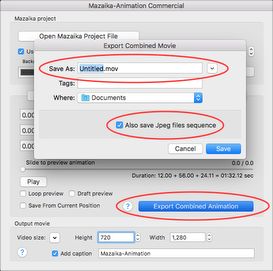
It will take some time to export the movie.

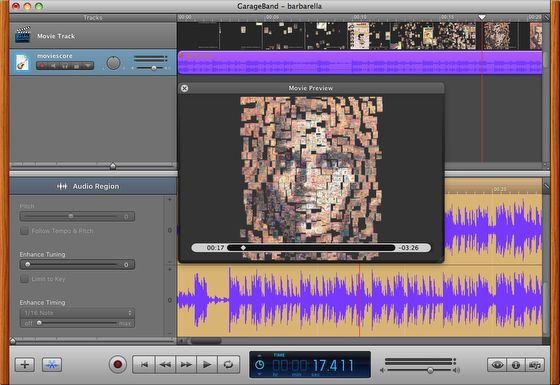
8 - Use your favorite editor to add an audio track. We used Garage Band.
How color correction works
Mazaika is well known for its ability to make a real photo mosaics. It may assemble wonderful photo mosaics from non-corrected pictures by placing most appropriate looking images to most similar looking mosaic cells. And it works! The only condition: you must have these appropriate looking images in your photo collection.
In the real world, when you make a mosaic for a customer, it is frequent that you are given only a limited number of photos. And even worse, colors of these images do not correspond with colors of the main mosaic image that your client wants to get. Kind of "Please assemble mosaic with my sweet red brick home standing at the scarlet poppy field from the photos taken in my last Antarctic expedition!" And there are only white and blue icebergs on these photos.
If you want to please your client you have to use color correction!
It's cheating, indeed, but even cheating can be done artfully and not too obvious!
Unlike normal, printed, mosaic, Mazaika-Animation gives you a way to keep color correction in secret. When you show the whole mosaic you show corrected tiles. When you zoom into the mosaic to show tile details you display original not corrected pictures.
Below is an example of this cheating. Old Nosferatu movie poster made from a collection of horror movie posters. This is a very tight condition. There are too much very dark, almost black, areas, add to it brown on white lettering over edges and keep in mind that all cells are unique.
Non-corrected animation at the left corrected one at the right. You see that separate flying and zoomed layers look the same but the whole mosaic view is drastically different. This way Mazaika-Animation may help you to produce very nice results even in quite a poor picture collection.
Difference between Simple and Controlled Fly-ins
This short video shows Simple and Controlled fly-ins side-by-side:
Both effects are similar but Controlled fly-in gives you more ways to adjust animation appearance.
Zoom sequence with an optimal path
When you have a number of photos that you want to show in a kind of zoom-in zoom-out slideshow there is a chance that these zoom-ins and zoom-outs will be looking too boring because of too much motion. If these photos are distributed all over the mosaic and you jump from one random picture to another, the camera will be moving for too long distance with every transition. Watcher will be overwhelmed with all these scrolling images and will not be able to concentrate on anything.
Mazaika-Animation can optimize these transitions and make the camera moves from one image to its closest neighbour. This way the animation will be to so intense that allows the viewer to see some details of images in transitions.
If you want to keep the order of images by yourself, indeed you may always disable this option.

