Using Click 2 Crop you can handle a huge number of photos easy anf fast. You may prepare photos for web site, for emails, for paper publications or just for a memorable album.
Different uses of images may involve different manners of editing. For example for a web site you want to make a small photos with your own watermarks while for the paper printing publication you need larger picture without text labels.
It is easy to configure Click 2 Crop for each task but if these task are repeat themselves day by day it is good idea to make some automatic to save your time.
Click 2 Crop allows you to create your own presets and save a set of settings for optimal use in each case and use them simply by selecting from the appropriate menu.
To save the current state of the controls in the new preset, simply select Add Current State as Preset... from the Preset menu.
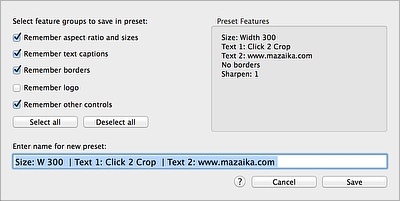
In the top right of the panel you can see a short list of options included in the preset. At the left you can enable or disable a group of settings.
When you call this panel it ticks groups of settings that are "on" (i.e. different from the default values). For example: if you use text captions there will be a tick mark beside Remember text captions option. if you do not use the logo there will not be a tick mark beside Remember logo option.
Note: If the group setting is switched off: controls in this group are not change when the preset is appied. If the group setting is enabled: controls are change to same state as they were when preset was created.
For example: If preset was saved with Logo option group un-ticked: When you apply this preset while the program has Logo option is on, the logo will be active. When you apply this preset while the program has Logo option is off, the logo will not be active.
If we have put a tick for Logo options group before creating the preset: When you apply this preset while the program has Logo option is on, the logo will be deactivated. (i.e. it will be changed to the same state as it was at moment of preset creation)
Preset name field: The program generates a short string describing the most basic preset options for the preset name. To make your future work easier we recommend to edit the name and change it to something meaningful and readable.
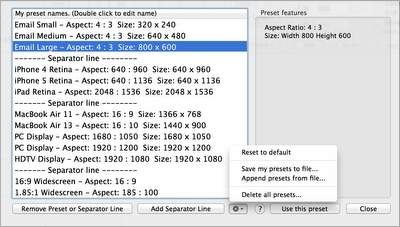
The program comes with a short list of simple presets that can sometimes be useful. You can easily edit this list by adding your own settings and deleting unnecessary presets.
At right-hand side of this panel it displays a brief description of the selected preset. On the left side there is a table presets. This is a quite common table . You can reorder rows dragging them with the mouse. To change the name please double-click on the row and it will go into edit mode.
To delete a row use the Remove preset or separator line button To add a separator, use Add separator line button.
Use the drop down button beside for more complex changes.
You can restore the original preset set using Reset to defaults.
You can save all the presets to a file using Save my presets to file.
Use the Append presets from file to add presets from previous saved file.
To delete all the presets, including the pre-installed ones use Delete all presets.
You can apply the chosen preset with Use this preset button.
Note: To add a preset, use the Add Current State as Preset... from the Preset menu. It will remember the current state of all controls in the new preset.